
Cinnamon buns (or sticky buns) that are an indulgent treat. Make this freezer friendly recipe and freeze them unbaked.
Today is a big day for me. I have been working on this cinnamon bun recipe for ages and I have it down to a fine art now. It is also a big day because I am announcing to the whole wide world that I am expecting a new baby in November! I’ve had a rough go of it during my first trimester, both physically and emotionally. With Timothy I didn’t feel sick once, and with this baby I have had nearly continuous nausea for about 2 months. Thankfully I haven’t been sick because that is a day ruiner, every time. I really feel for those women who are suffering so badly that they can’t keep anything down.
On the emotional side of things, I thought, “Oh shit. What have we done?” I am unemployed with no prospects for employment any time soon and being pregnant will make it very difficult for me to find a job. I dearly love my boy but being a stay at home mom is hard for me because it was never part of the plan I had for my life. I am not a ‘kid person’. I always wanted a career and I was prepared to be a working mother after Tim was born. Many women will read this and may even want to say some nasty things about my desire for a career over the privilege of staying home. If they do, so be it. As it stands now, I will continue to be a pretty good stay at home mom and will hopefully carve out a career on my own terms through this blog and the historical podcast that I’ve been working on.
I am not a supermom and there are far better mothers out there to whom motherhood comes naturally. They love playing with their kids, show great patience, enjoy organizing play groups, and probably hardly ever let their kids watch tv. I am not one of those mothers. I do not get into playing, I am impatient, quick to yell, I spoil him with toys (which may fall under a ‘good mom’ category depending on the day), having other kids over to my house is anxiety-inducing for me, and I let him watch way too much tv.
I am very good at the nurturing side of being a mother. I’m a champion back tickler, I make good food for him most of the time, I make all the necessary appointments for speech therapy etc, I praise him for all the wonderful attributes he has and good things he does, I help him write his comic book stories, clean his clothes, and give ample hugs and kisses every day. I know I am a good mom but the emotional weight of being pregnant again while dealing with my self-confidence issues and career failures has been hard on me. Top that off with feeling like I may throw up all the fracking time hasn’t helped. As my bump grows and my nausea dissipates (most days), I am coming out on the other side and starting to feel the happy anticipation of a new baby joining our little family but it has been a slow process.
Having my pregnancy announcement in the same post as my cinnamon bun recipe isn’t a coincidence. I know it is not all that creative but I thought that something to do with ‘bun in the oven’ was a good idea, if it is a little on the nose.
I am very particular about my cinnamon buns. Absolutely no nuts and no white icing (like Cinnabon). If you want to ruin your cinnamon buns with pecans or whatever other horror you want on your cinnamon buns, then go right ahead. I am a pretty passionate anti-nut evangelist when it comes to nuts in baked goods that interrupt the soft texture of whatever treat is tainted with a walnut or pecan. I like nuts as crusts for tarts, see my rhubarb custard tart as an example, or cookies where the nuts are ground so the texture of the cookie remains consistent. I have always been a picky eater and I have improved as I have gotten older, but when it comes to nuts, I let my picky-eater flag fly proudly.
I have very loosely adapted two recipes to make this one. One recipe from an old Canadian Living book and another from a Cooks’ Illustrated recipe. They both had aspects of them that I liked but neither one was just right. So this is my mama-bear version of cinnamon buns.

Instead of one 9″x12″ cake pan, use two round cake pans and freeze one so you can enjoy fresh baked cinnamon buns another day.
The recipe makes a dozen buns but that many at one time would just go to waste in my house. I like to put them in two round cake pans rather than one 9×12 cake pan. I wrap one pan well with plastic wrap and freeze it before the second rising in the pan. Once they are thawed and are at room temperature for about 45 minutes, I bake them as normal. I have also made a batch in a foil rectangular baking pan that came with plastic lid, frozen the whole thing and brought it over to a friend’s house as a gift so she could bake it in her house. That way she could enjoy the smell of baking cinnamon buns in her own kitchen. The make-ahead aspect of this recipe also works really well for holidays. Make them the week before Christmas, thaw them overnight in the fridge and bake them Christmas morning for an indulgent breakfast to accompany coffee by the tree.
This recipe calls for maple syrup and whipping cream in the sticky topping. This really helps it to not turn into a filling destroying hard toffee as the cinnamon buns cool. Pay close attention to the baking time though because if you let it bake too long then despite the maple syrup and cream you will be in tooth cracking territory. For two round pans, I found 29 minutes the perfect time in my oven. The buns around the perimeter are a deep golden and the centre one is lighter. With the larger pan, I wouldn’t go higher than 35 minutes but you would be safer to stick close to 30-33 minutes.
So are you pro-nuts in cinnamon buns (I shudder as I write that)? I’m a little nervous to ask what you think of my motherhood and pregnancy confessions. Do you think it is just hormones and a run of bad luck in the career department?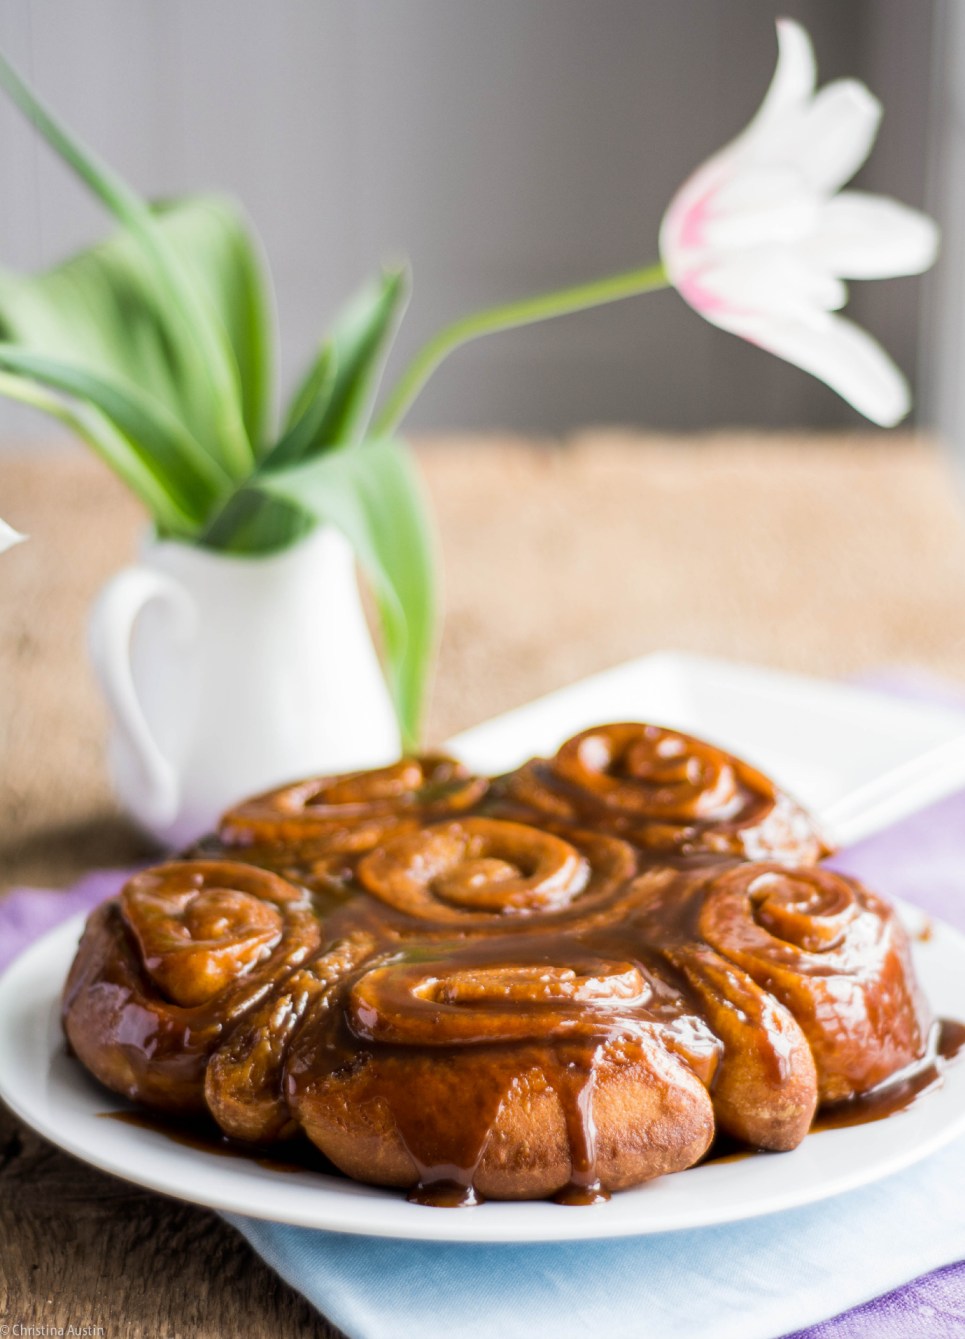

Cinnamon Buns aka Sticky Buns
Ingredients
Dough
- 1/4 cup warm water
- 2 1/2 tsp dry active yeast
- 1 tsp granulated sugar
- 1/2 cup buttermilk room temperature
- 3 large eggs lightly beaten
- 1/4 cup granulated sugar
- 1 tsp salt
- 3 1/2 cups all purpose flour
- 1/4 cup butter melted
Filling
- 1/4 cup butter melted
- 1/2 cup brown sugar
- 3 tsp cinnamon
Sticky Topping
- 1/2 cup butter
- 3/4 cup brown sugar
- 3 tbsp maple syrup
- 2 tbsp whipping cream
Instructions
- Measure flour into a small bowl and set it aside. This will help make sure you don't add too much which would give you a stiff dough.
- Mix the warm water, 1 tsp of sugar and yeast together in small bowl and let sit for five minutes to bloom the yeast.
- In the bowl of a stand mixer fitted with the dough hook (see notes for how to make this without a mixer), add the buttermilk, eggs, the rest of the sugar and salt.
- Mix in 1 1/2 cups of the flour and the yeast mixture. As the dough hook brings the flour and liquids together, add the melted butter. You may have to scrape the sides down so that the flour blends in.
- When you have a sticky, uniform looking mixture, start added the rest of the flour 1/4 cup at at time. This will take a few minutes. When you have about 1/4 cup of flour left in the bowl, slow the mixer down to minimum and just sprinkle the flour in until you get a ball that can be turned out on a floured counter or board without it being a sticky mess.
- With the dough on the floured surface, sprinkle more flour on the dough and knead the dough for two or three minutes. You will use almost all the flour but you may need a bit more or less, depending on the size of your eggs, or humidity in your home. The dough is ready to be placed in a greased bowl when it springs back and isn't sticky when kneaded.
- Cover the bowl with a clean tea towel and place in a warm, place for 1 1/2 hours to rise.
- When the dough has doubled in size and when you poke your figure in the centre the hole stays, it is ready to be punched down and rolled out.
- Just before you roll it out, prepare the filling by melting 1/4 cup of butter in a small bowl in the microwave and mix together the 1/2 cup brown sugar and cinnamon in another bowl. Set that aside.
- Melt the 1/2 cup butter in a small pot on the stove whisk together the other 3/4 cup of brown sugar, maple syrup and whipping cream with the butter as it melts. Heat the ingredients until butter until it is just melted and the mixture is uniform with no oily parts of unincorporated melted butter. Try not to let it bubble as this will contribute to the topping hardening later. Pour the mixture into a 9" x 12" cake pan or it into two round cake pans. Set the pan or pans aside.
- On a lightly floured board, roll the dough into a 14" x 18" rectangle using a rolling pin.
- Brush the melted butter onto the rectangle evenly leaving a 1/2" perimeter without butter. Sprinkle the dry brown sugar and cinnamon mixture evenly on the melted butter.
- Starting with the long side closest to you, begin rolling the dough away from you. Use your fingers to make sure the dough stays tight and even as you roll it.
- With the seam on the board, cut the log into 3 even pieces using a serrated knife. Then cut each third into 4 even pieces.
- Holding the seam of each piece, put each piece evenly spaced on the pan prepared with the sticky topping. Place the end pieces cut side down.
- Cover the pan (or pans) lightly with plastic wrap and let the buns rise for 45 minutes.
- When the oven is preheated to 350 degrees F, bake the buns for approximately 30 minutes or until the outer buns are deep golden brown and the centre buns sound hollow when tapped lightly. Do not over-bake or the sticky topping will harden when the cinnamon buns cool.
Instructions for Freezing
- If freezing the dough, cover the pan tightly with two layers of plastic wrap that wraps totally around the pan (otherwise it won't stay on) and freeze until needed.
- To thaw: let the buns thaw in the fridge overnight or set the pan on the counter to thaw more quickly.
- When the buns have been warmed to room temperature for a half hour, preheat the oven and bake the same as above.
I wish you lived closer I would pay you for your baking. I’m not keen on exact measurements of things and substitute stuff in recipes, which works alright for some things, but not for baking. And congrats on the news!
Thanks :). We hope to make it out east some day, although I won’t be able to bring any baking with me but it would be great to see you again. I bet our boys would have a blast!
Wonderful news Christina! Congrats to all three of you 🙂 I’m not a mom but I think it’s pretty normal to have a lot of mixed emotions over any major life event and when you feel physically rotten, that never helps. Don’t beat yourself up over it!
Thanks Melissa. I think a lot of people can relate whether or not they have children. We all have our insecurities in our lives that play on our minds when we are under stress and like you said, when there are major life events.
I’m very excited, for cinnamon buns and your good news 🙂 I am also anti-nut for the same reasons! Though, I am pro raisin so they make an appearance in a few. I’ve had my own pregnancy cravings for sticky buns so I might need to make these!
I’m good with raisins. I think they go well with the cinnamon and brown sugar plus they get squishy as they bake in things. Plus, if you make them and freeze half like I do then you could do the work once but have fresh baked cinnamon buns twice. 🙂
The honesty of your post really resonated with me. I am career-minded as well and definitely not a “kid person”. Although I would like to have a family one day (we’ve been married 2 years and that’s all anyone asks now), the thought of having children and taking time away from work terrifies me. But the way you described your experience as a mother was fresh, honest and reassuring. It sounds like you are doing a great job at it, as well as blogging at the same time. Oh, and the cinnamon buns look tasty too 🙂
Thanks so much Jennifer. It means a lot that others can really relate to some of the struggles I have been having.
Oh and the baby questions are so irritating. We didn’t have children until we were married for 5 years and then right after our son was born people would ask when we were going to have more. I mean, my kid is super cute so it is nice to have more kids like him in the world, but come on. Give a girl’s uterus a break. 😉
Such a honest post Christina… and you sound like a fantastic mom. I went back to work when Adz was four months, I needed that break. I worked until she was two, and our move to Canada meant I was a stay at home mom for a year, which drove me (and her) crazy. Everybody’s different, and there is no sense in beating yourself up about who you are. Some women are brilliant stay at home moms, some are brilliant career moms… but what’s common to all of them is that we are all great moms. And that’s all that matters.
Thanks Michelle. Most of the time I know that I’m a pretty good mom (never tried to be supermom). It is great that you recognized that going out to work was the best choice for your family when your daughter was a baby. Being a stay-at-home mom when it isn’t the best fit can be really tough. I know that when we can afford for Timothy to go to daycare at the home daycare he went to for a couple years, we are all happier. The poor kid gets lonely at home with his boring mom. He needs kids around to play with, so for us, daycare is the best place for that. He is in school full-time now so that has been really great for us. It was an awfully long summer before school started. I will do my best to keep him occupied this summer, and Netflix will be a part of that. Meh. So be it.
Congratulations! I admire your candour in writing about your concerns about motherhood and life. I haven’t yet chosen (or found the courage) to be so forthcoming on my own blog.
I don’t think there is such a thing as a perfect mother. We all have shortcomings and strengths when it comes to parenting, and it’s too easy to judge others. What may look ideal in other mothers – like someone who plays with their children a lot – is not necessarily so. I, too, did not enjoy playing with my children when they were little, and I think that made them more self-reliant. They didn’t need me to entertain them all the time, but could have fun on their own or with each other.
My children are grown now and I have grandchildren that make my heart sing. Are there things I wish I’d done differently? Yes! But, on the whole, I think I did a good job, and it seems pretty clear to me that you are too.
And, BTW, those cinnamon buns look great (and yes, I like to put pecans in mine – let’s agree to disagree).
Thanks Marlene! I will just pretend that you won’t be making cinnamon buns with pecans. If I think about it, it will just make me sad ;). Just kidding – enjoy them however you like (although they are technically ruined – lol).
they look yummy!
Thanks 🙂 I still have some in my freezer ready to be baked. Maybe I will take them out this weekend.
I may have run across this well after you should be a happy mom of two, but. Congratulations.
I am also a nut purist, in that they do not belong in the body of a baked good item. I do make nutmilks which means they don’t have to be chewed, and creamy nutbutters (same thing, no chewing). These look perfect to spoil my better half with (I am celiac, so he gets the wheat). Thank you so much for sharing.